Showing posts with label Sewing Projects. Show all posts

Friday, July 30, 2010

Most of you know that we had to change our home office into the nursery. We have a three bedroom house with no finished basement at this time and it was more inportant to us that the children have their own rooms, than it was for us to have a full on office space. So in making the room, we have taken down our main computer in the house. A few months back, we got rid of Time Warner Cable's cable service. We couldn't justify spending $70+ a month on cable that we hardly watched. All of the main broadcasted channels are free over the airways (and are in HD with an HD antenna). Plus, with television access to Netflix and so many channels airing their shows online (and lets not forget HuLu)... what's the point of having cable?

We have mounted our 32 in flat screen above the fireplace and hidden the cords within the wall. Paul then set us up with Windows Media Center, an interactive database of all the broadcasted AND online shows nicely put together in one program system. The cost to set this program up (a video card for your computer) was about $200. When saving $70 a month on a cable bill - it was paid off in a matter of three months! We can watch the normal main channels (ABC< CBS< FOX etc.) in HD, along with the online shows of HBO and HuLu, listen to the radio, play DVDs and access our Netflix from this program.

Now, since our computer was taken down from the office, Paul went a step further to hook up our PCs out in the living room as well... and we use the 32 inch flat screen tv as our monitor for the computers. We are able to easily switch from his PC to mine with a click of a button. We can also watch the BluRays from the player and allow Jax to use his V-Tech video system from the tv as well. I do prefer to use the laptop (and wirelessly remote to my PC through our network system) to do my blogging/surfing because sitting back on the couch with a wireless keyboard and mouse puts me too far away from the screen to see as clearly as I would like.
Anyways.....
Here are the latest projects I have been working on:
Unfinished wooden stool from JoAnns - 40% off $14.99


Two coats of white spray paint
medium pink acrylic paint
scrapbook paper for the flower
Mod Podge to adhere
Polyurathane/Varnish to finish, protect and add gloss

Three frames that were chipped and on clearance for $1.50 each! Great find from my mother in law. I spray painted them all white then decided to only use 2 of them (will show them finished later).


I had this basket (sans fabric) in the bathroom holding guest towel. I took a large scrap of the left over fabric I used for Jaelyn's window treatments/ bedding to make an elastic lining for the basket. This will go in her room as well. Wait until I show you what I put in the bathroom - it place of the basket!!


Here's my monkey man! Please excuse the complete misuse of White Balance and the horrendous flash effect. Sometimes you just don't have the time to change the settings on the camera when you're literally RUNNING after a toddler to get a photo of his silliness!
40

Friday, July 16, 2010

Project #8 - Nursing Cover / Nursing in Public

My next project was the nursing cover. I followed this tutorial, very simple instructions by the way, and it turned out great, but this was a whole new concept for me.

With Jackson, I never nursed in public. I was never comfortable breastfeeding where others would see me. A big reason for this was because I never became a "graceful nurser". I always felt clumsy when I "pulled it out" and put him to my breast. Plus, when I was at home with my husband I would never wear anything that would conceal the feeding. So attempting to fumble around beneath a cloth just didn't appeal to me. So, never the less - I would also bring an expressed bottle if we in public, or would excuse myself to an empty room if we were at someone else's house.

I began thinking lately about how it always seemed to take me an hour and half just to get ready to leave the house, no matter where I was going. When Jax was an infant, my preparation for a trip out would begin with breastfeeding him at home, then taking another 30+ mins to hand pump for a full bottle to take along. Then I had to restock the diaper bag with fresh burp cloths, bibs, diapers etc. Then I would change him and finally we would leave the house. So this lead me to think - is it really going to be like that again with our daughter? Only this time - I will have an impatient toddler begging for us to JUST LEAVE ALREADY!

When I wasn't feeding or holding Jackson (infancy again here), it was an opportunity for me to pump and store milk. Whether that milk would be used for a trip out of the house, to be used with cereal/baby food or just stored in the freezer, it didn't matter. I spent way too much time HAND pumping with my son. Remember this photo?

My reasoning behind that was I wanted my milk to carry him along until he could take whole milk. I didn't want to first breastfeed, then convert to formula, and finally transition to whole milk. But I had never breastfed before and I didn't know how long I would handle doing it or how long my supple would last. So I pumped as much as possible while I knew my supply was good and strong.

Well, this time I am armed with a good 10 months of experience. I had conquered the initial 2 weeks of cracked and bleeding nipples, lots of tears from feelings of failed mothering and countless clogged ducts included one bout with mastitis. So this time I know what I am capable of. I was thankful that I had pumped and stored all that milk, but I also realize now that I don't need to be that obsessive about it. With this new baby, I don't want to take EVERY opportunity I have to pump and store - rather I want to take EVERY opportunity I have to play with my son.

And so comes the need for - the nursing cover. I feel as though I will be more comfortable to nurse in public this time around. This way I won't have to spend so much time pumping for a bottle just to leave the house. Don't get me wrong - I will still be pumping and storing, just not to the extent as I did with my son.

Then I took a little bit fo the extra fabric and make a newborn head band.


40

Friday, July 9, 2010

Project #7 - Toddler Dress


I was a bit nervous when I was creating this dress. It was my first time following a cut out pattern and I just couldn't visualize the end product. But I think it turned out adorabley and she will be able to wear it next summer at 9-12 mos. I have picked out another fabric to make one more just like it. I will probably incorperate a ribbon border at the bottom instead of the flower pin.


Here is a shot of my two favorite boys in the whole world!


Thank you to everyone who left me encouraging comments on my last post. I am still nervous about how he will adjust. My trend of life seems to be "over worry and I am always pleasantly surprised when things go better than I anticipated." I just love this little man with all my heart and I don't want him to feel "replaced" or "rejected" even for a minute.

 But my sister in law said the most meaningful thing to me,
that the best gift a parent can give their child, is a sibling.

PS. anyone else constantly getting comments with the asian letter/characters? I thought the word verification weeded out those annoying comments!


40

Monday, July 5, 2010

Project #6 Baby Booties


I made these booties a couple of nights ago from a pattern in a book I purchased. I was not entirely thrilled with the way they turned out. They are definitely cute, but the shape of the toes are a bit non symmetrical. Kinda looks like two left shoes to me :) Also, because of that... the buttons appear to be on the wrong sides because of the orientation of the shoes. I just am not skilled enough sewing in tight curves with such small pieces. All the projects I have done so far have been made of strictly straight lines, so this was a challenge. I will probably only have the patience to make one more pair. These are 0-3 mos, and the new ones will be 3-9 mos.

I have been making alot of these flowers (like the ones from mobile). I have turned them into hair clips and brooches. You can follow Heather Bailey's tutorial here.


40

Wednesday, June 30, 2010

Project #5 - Recycling an old Crib Mobile

I created This Mobile...


From This One!!
That's right - I recycled Jackson's crib mobile!

I took apart Jax's old crib mobile and looked at how the canopy was sewn together. I rolled up my sleeves and designed my own for our baby girl using the hardware from his. Thanks to Paige for tipping me off to Fabric.com. I found some fabric I liked and ordered enough for making curtains, a bed skirt and this mobile. I have some left over too for small projects... all for less than $40! I will be purchasing a couple fitted crib sheets and the breathable bumper from Walmart.com. When all is said and done, I will have spent about $80 on her whole bedding and window treatment set. Compare that to Jackson's store bought $150 set.
HA! Oh how we learn with our second child :)

Here's how I did it! It took some time and patience, but was pretty simple.

First I looked at how the old one was put together.


1 piece of fabric at 11x11
4 folded flap sides at 11x6
4 corner triangle pieces to support the canopy arms


I wanted to add a little flair to the folded flaps on the sides, so I purchased this ruffled ribbon. I cut them to the same length of the side pieces.

Using Crafter's Pick Fabric Glue...


I draw a line down the center of the ribbon and attached it to the unfolded flap piece. I placed it about 2/3 the way down the piece because I will need to fold it before attaching it to my 11x11 square.

I did that to all 4 flaps.


Then, I pinned the 6" sides to give the flap pieces a finished edge and hide the end of the ribbon.


Once the edges were sewn, I then folded the flap leaving more green fabric to one side to allow for a 1/4 seam allowance.

Then I placed it face down on top of the 11x11 square (like sides together).

And pinned on all 4 finished ribbon sewn folded flaps.


Remember that corner piece to support the canopy arms?

Here's how you do it. Cut out 4 squares roughly 3.5"x3.5".

Fold them in half to form a triangle and pin the open sides to the corner of the 11x11 square. This pieces NEEDS to be places on TOP of the flaps.

Here, al the corners are pinned.
SPECIAL NOTE: I forgot this step at this point so I had to improvise later. *Now is also the time you would attach the strings to your dangling mobile pieces. Insert the string between the corner triangles and the 11x11 square.

Here are my dangling flowers. I used Heather Bailey's tutorial to make these adorable fabric ruffled flowers. I made 6 flowers. 5 to dangle (1 being larger for the center) and 1 for the music box.

On the back of the flowers, I used fabric glue to attach a strip of felt. Allow this to dry for a few minutes.

Then I knotted my string through the felt strip.


Then I cut out a circle from the same felt and cut a tiny hole in the center. I wanted to cover the strip of felt with a more pleasing circular patch.


Then I glued this down. See how that looks more like the back of a flower?


Here's my dandling flower. Repeat this for all your flowers (except the 6th one for the music box)
*These are the strings that you will insert between the corner triangles and the square 11x11 piece.

This is your mobile after you have sewn the corners (imagine the dangling pieces are sewn in too)


Turned right side out


The underside:


Now sew in a button hole, or using your zigzag stitch to create the hole for the top of the canopy holder.


I used the zigzag technique, so I had to do was carefully cut the fabric between the sewn lines.


THen I cut a separate long (40 " x 5") piece of fabric to cover the stem of the mobile. I pinned the ends and stitched a finished edge. Then folded the piece like a skinner hotdog and stitched all the way down.

Flipped it right side out and this will ruffle to cover your stem completely.


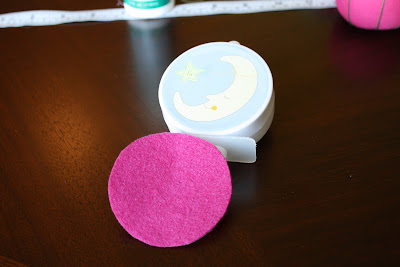
Covering the music box. I cut out a felt circle the size of my music box face. I hot glued that one to cover the moon completely.


Then I hot glued my last flower to the over the felt circle. That's finished!


Then I attached the all the hardware back together and set up my baby girl's mobile!


Her view.... (alittle dark, sorry!)

40